Now that you know a little bit about why we sometimes spread out blog posts out onto two different pages, I’m excited to show you how to do this so you can implement the technique on your own blog. If you missed the beginning of our post, you can get back to the first page by clicking the image below.
Now the answer to your big question. To create a multiple page blog post, all you need is a little bit of code:
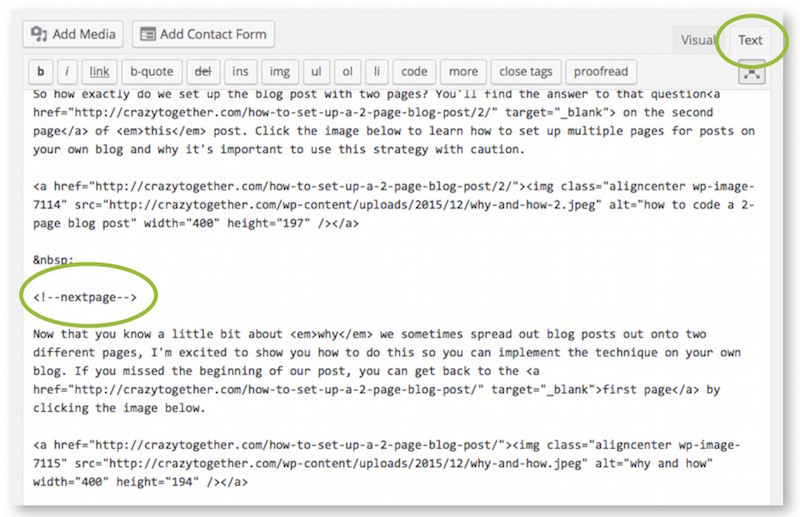
<!--nextpage-->
While editing your blog post, click over to the “Text” editor and type <!--nextpage--> where you want the page break to occur.
If you’re not sure how to get to the Text editor, just click on the little tab underneath your post’s title that says “Text”. Once you do that, all of your content will be formatted in HTML. You must add the next page code in the text editor for the code to work properly.
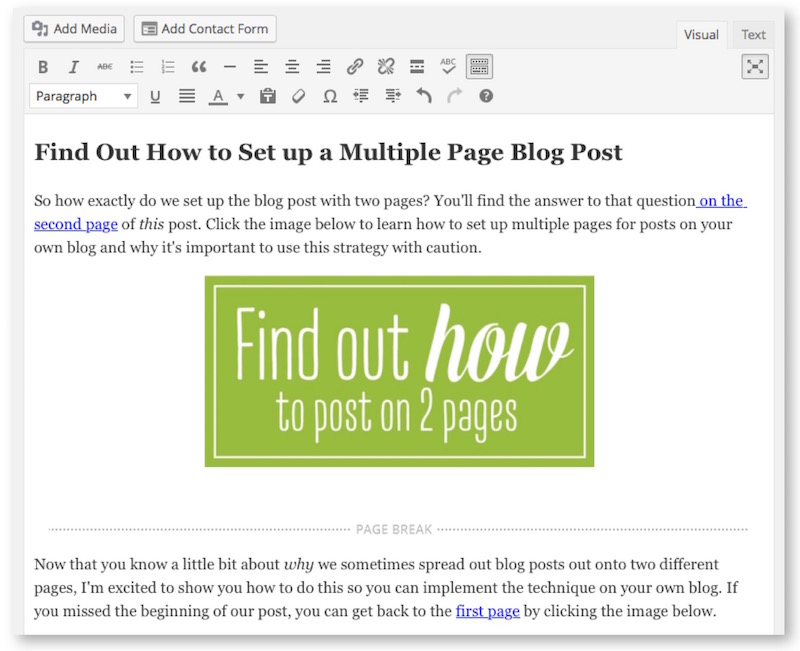
When you are done, just click back to the visual editor by clicking on the “Visual” tab at the top of the post. A horizontal line with the words “PAGE BREAK” will appear in your text in the visual editor. If you preview your blog post, you will be able to see the 2-page setup. You can see my own page break in the image below.
Help Your Readers Navigate Between Pages
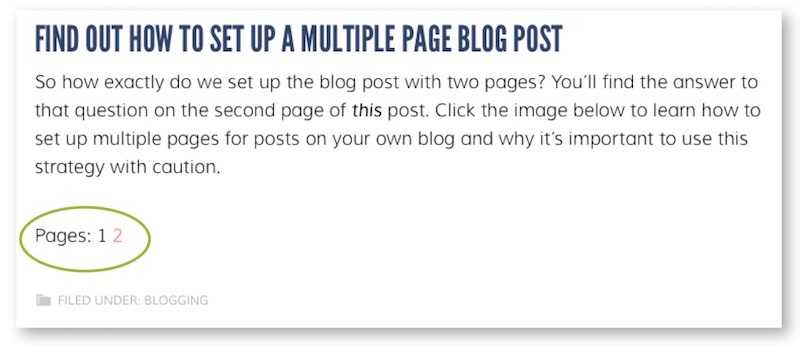
Establishing a two-page blog post is only half the battle. It’s also your job to make sure that your readers know exactly where to go. The default formatting of our blog shows a link to the next page in small print under the very bottom of the post. Often an ad appears above the navigation and it is very easy to overlook. Many of our readers could easily be lost and confused by the abrupt end of our text. They might suspect that we still have more to say, but they wouldn’t know where to find the rest of our message. You can see the page navigation circled in green in the image below. To find the rest of the content, our readers would have to notice the navigation and click on the tiny numeral 2.
Help Your Readers Find the Second Page of the Blog Post
To guide my readers and ensure that they know exactly where to find the rest of the content, I always create a graphic and place it at the bottom of the first page. People are visual and I know their eyes will be drawn to the bold print. I link the graphic to the second page and I write a paragraph that also directs readers the the second page with a link included somewhere in the text.
Using an image, a paragraph with a text link, and the simple navigation provided by WordPress helps ensure that my readers will know exactly where to go to find the rest of the information they are looking for.
Direct Readers Back to the First Page of the Blog Post
It is also important to direct readers back to the first page of the blog post as well. Not everyone who reads your post will start on the first page. Each page of your blog post will have a unique URL and a viewer may share the URL of page 2 with a friend or pin an image from the second page onto Pinterest. Anyone who follows those links will automatically be taken to the second page of your post.
Since I know that some of my readers will start at the second page of the post, I always open page two with a summary of the topic and a link that takes them back to the first page so they have easy access to all of the content. I also add an image that is linked to the first page of the post because people are visual and they will pay more attention to the image than the words in my paragraph.
You can see an example of my introductory paragraph and image at the top of this page.
How to Identify and Create Links for Your Pages
Once you write text and add images that direct readers to each page of your blog post, you will be ready to add permalinks to those paragraphs and images. I just updated to WordPress version 4.4 and was happily surprised to discover that creating links for both pages of a post is much simpler if your title is short. If you have a longer title, read a little further down the page for those instructions. Let’s start with the easy stuff first.
Create a Link for the First Page of Your Post
The link for the first page of your post is displayed beside the word “Permalink” just below your blog post’s title. Select all of the text in the link and copy it. Make sure you include the forward slash at the end of the link. It’s important!
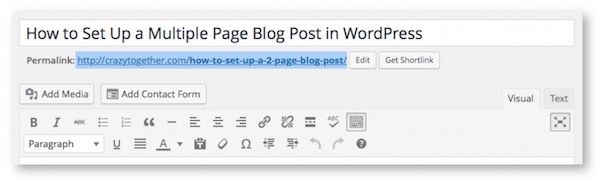
In this case, the first page of my blog post’s link is:
https://crazytogether.com/how-to-set-up-a-2-page-blog-post/
How to Create a First Page Link for a Post with a Long Title
If you haven’t updated to the latest version of WordPress or if the link is too long, you won’t see a complete blog post link at the top of your post, which means you have to take a few extra steps to create your link. This part is kind of a pain, but I haven’t found a way around it so you just have to roll with it (or delegate that task to your loving husband like I often do).
To get started, you’ll need to look at the permalink information at the top of the post you are editing. Start by copying the URL of your blog’s home page. In this case:
https://crazytogether.com/
See the forward slash at the end of the URL? Make sure you copy that too. It’s important!
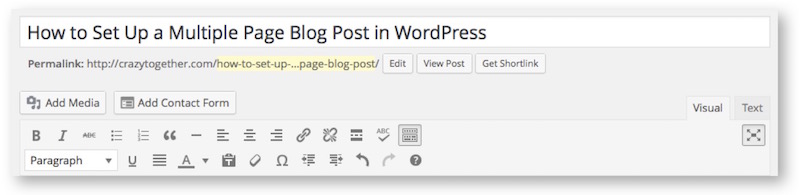
To obtain the rest of the URL for the specific blog post, you will need to click the “edit” button.
Highlight all of the text in the box and copy it. Then paste that text after the forward slash at the end of the blog’s home page link that you copied a moment ago.
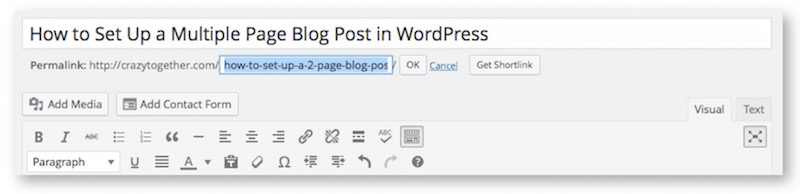
My link now looks like this:
https://crazytogether.com/how-to-set-up-a-2-page-blog-post
As a final step, add one last forward slash at the end of the complete URL. The full URL to the post will look something like this:
https://crazytogether.com/how-to-set-up-a-2-page-blog-post/
Create a Link for the Second Page of Your Post
Once you have the first link established, it’s easy to create a link to the second page of your post. Simply take the entire first link, then add “2/” to the end of the link. For this post, the second page link looks like this:
https://crazytogether.com/how-to-set-up-a-2-page-blog-post/2/
I know that WordPress provides a shortlink that you can use instead of the full URL. I love that shortlink as much as the next girl, but it doesn’t work for the second page of the post (not even if you add “/2/” to the end of it.) In this case, taking a shortcut won’t work. Take the extra time to do it right and ensure that you won’t have any broken links.
Once you have links to the first and second pages of your post, add the corresponding link to your directing text and image and the bottom of page 1 and the top of page 2.
A Few Notes on Generating Links for Your Pages
These links will only work after your blog post has been published, so you won’t be able to test them out ahead of time. You can still preview both pages of your post by using the navigation options that WordPress automatically provides at the bottom of each page.
The links you create will only work with the title of your blog post at the time that you generated the links. If you change the title of your post, it could change the URL for each page, which would then break your existing links. I often change my blog post title a few times as I write a new blog post. For this reason, adding page links is often my last step before I publish my post.
Don’t use the shortlink for you blog post!
It won’t work on the second page even if you add “/2” after the short link.
After your blog post has been published, be sure to test the links you created and make sure they are working properly. If they aren’t, you are most likely missing a forward slash somewhere in your URL or perhaps you changed the title of your blog post after you created the links.
Consider Your Readers’ Experience
Now that you know how to spread your blog posts out among multiple pages, you might be tempted to transform all of your old posts into a multi-page format to capitalize on your traffic and increase your daily page views. While that is one option, it may not be the best option for your blog at this time. Readers like to enjoy a blog’s content with minimal clicking. When a visitor gets to the bottom of your first page, they have a choice to make. They can click over to the second page and read more of your post or they can decide that they have read enough and leave your blog.
I highly recommend using this format sparingly and only saving it for those posts that you are certain readers will be engaged enough to take the extra click to read more. People have short attention spans online these days so save it for your very best blog posts.
Our hope is that you have enough knowledge and tools in place to help you make the very best decision about how to format your blog posts for yourself and your readers.


Haha I see what you did at the end there! Clever! Thanks for explaining–I was wondering ;)