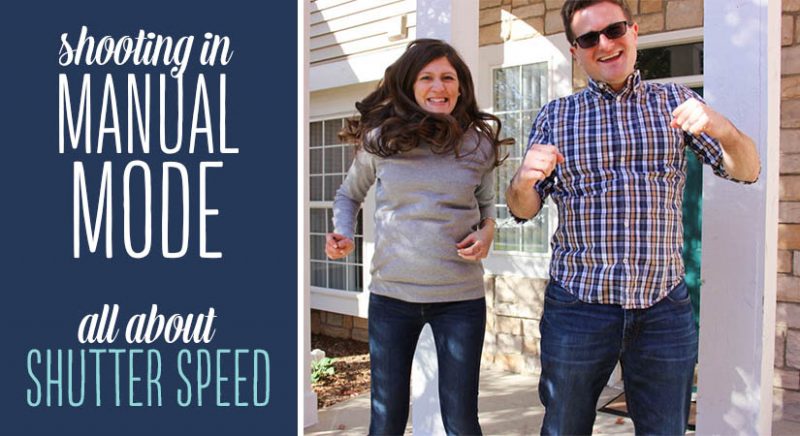
As part of our ongoing photography series Crazy for Photography, I’m breaking down the four things you need to dramatically improve your photos. On the first page, we learned that paying attention to the available light and setting your ISO are the first steps. If you’re just joining us, you can click the image below to learn about those. Next up, we are going to learn about aperture and shutter speed.
Step 3A: Select Your Aperture/f-Stop

Aperture or f-stop is the size of the opening in your lens that lets light in. It’s another way to control light in the camera: the bigger the opening, the more light you let in. The trade-off is that a larger aperture (i.e., a bigger opening) leads to a blurrier and more out-of-focus background. In photography, this is referred to as “depth of field.” Aperture numbers are written like f/1.4, f/2.8, and f/4.
The larger the number gets, the smaller the opening is, the less light hits your camera sensor and the less blurriness you have.
Conversely, the smaller the number gets, the bigger the opening and the more light enters your photo and the more blurriness you have.
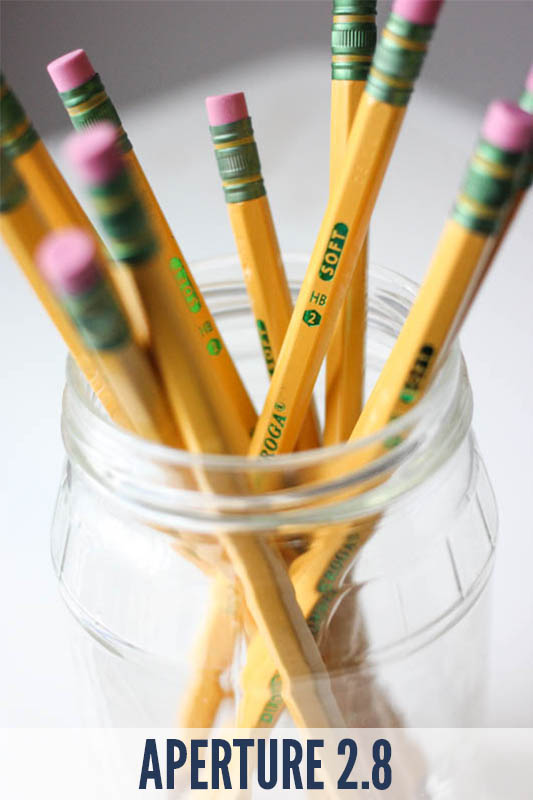
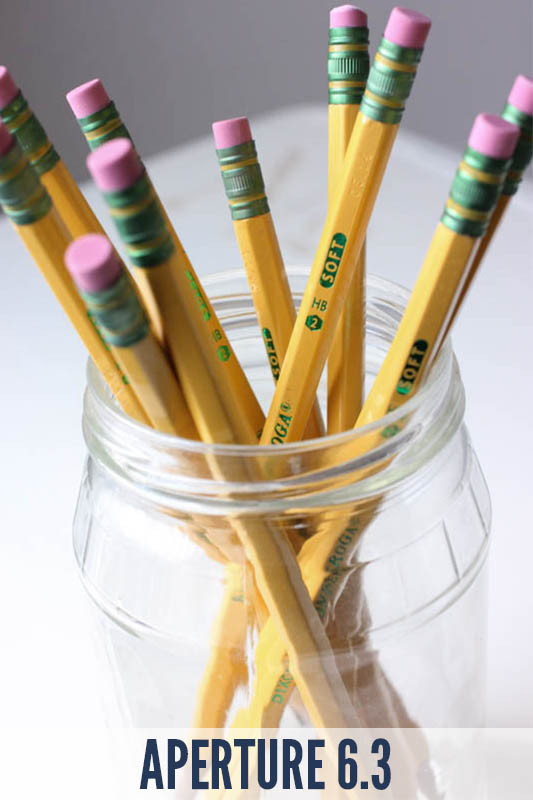
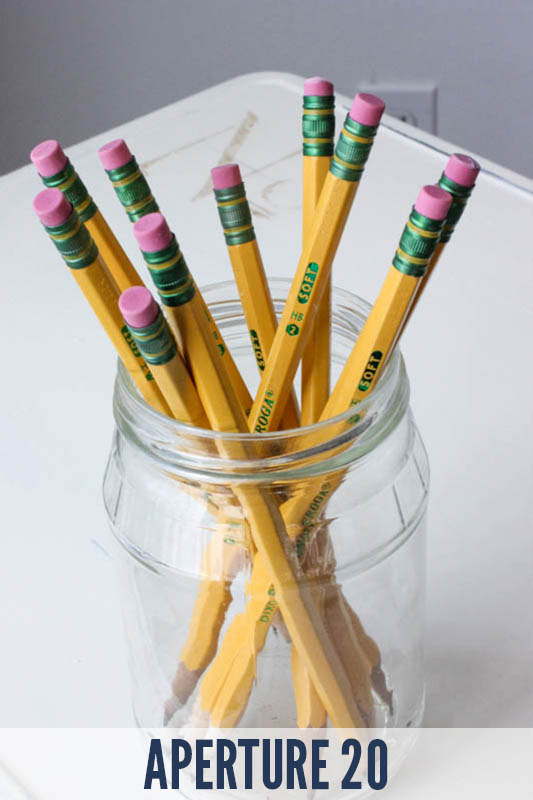
Here is a series of shots with f/2.8 and f/6.3 and f/20 to give you an idea of how they compare.
 |
 |
 |
Note that the erasers in the photo with the 2.8 aperture are all out of focus, but the word “soft” near the center of the image is quite sharp and clear. It is very difficult to discern any details in the background of the image.
For the 6.3 aperture photo, the pencil erasers are more in focus, with only a slight amount of blur. The background surface is a little more sharp and you can begin to see faint text painted onto the back corner of the table.
The photo with 20 aperture has much more clarity. You can see more details on every pencil. You can also see the trim along the edge of the table, the text painted onto the corner of the table, and even a plug on the wall behind the table.
For our blog photos, we use a range of apertures (many of which depend on the lens you are using), but normally we try to be in the f/2.8 to f/3.2 range. That range gives you a broad focus, while still having a small, but noticeable, depth of field with slight blurring in the background.
There is no right or wrong setting for aperture. It all depends on the artistic quality that you are trying to achieve. For the pencil photo, Maria preferred the image with an aperture of f/2.8 because she loves it when object photos have a soft blur to them. If you were a landscape photographer, however, you would probably want to shoot with a high aperture (small opening) to keep any blurred details to a minimum and have tack-sharp images of the scenery around you.
The photos above were all taken in the same ISO (1600 because it was overcast outside) and with different apertures. Normally, you would expect to see a difference in brightness between those photos because the size of the lens hole is changing from wider to smaller. The image with the 2.8 had potential to be significantly brighter than the others, with the 20 aperture photo should have been much darker than the other two. The reason they all have similar brightness, however, is because of the third camera setting to adjust while shooting in manual mode: shutter speed.
You may have noticed that I called aperture “Step 3A” rather than just “Step 3.” I do have a reason for this. Usually, I would tell you to adjust aperture before adjusting our next camera setting (shutter speed), but not always. Sometimes, shutter speed is more important than aperture, so you should adjust the shutter speed first. It depends on what you are photographing, as you will see.
Step 3B: Adjust Your Shutter Speed
The shutter speed controls how long the shutter is open and letting the light strike the camera sensor. A longer shutter speed means more light, which means a brighter picture. You usually see shutter speed in fractions of a second, like 1/80 or 1/200. My camera is kind of old, so it often doesn’t display the numerator (the “1/”), just the denominator (the “80” or the “200”).
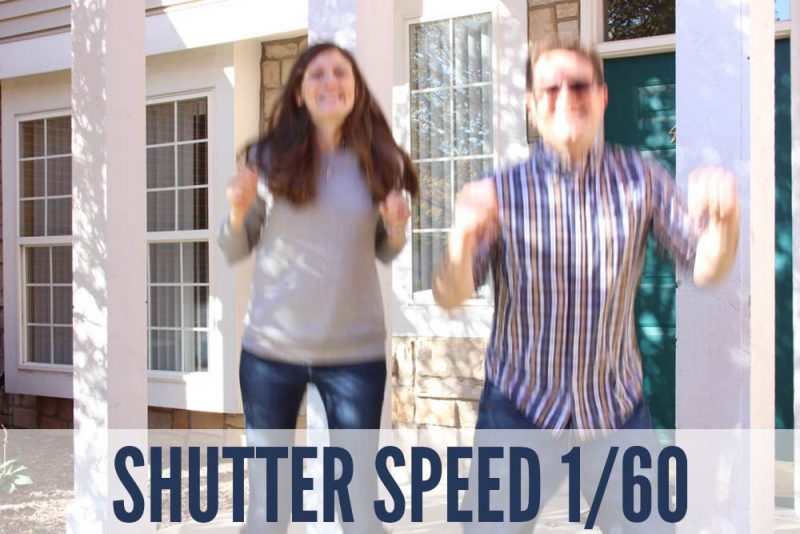
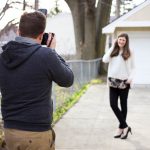
When it comes to shutter speed, the trade-off to be aware of is that slower shutter speeds can lead to motion blurring, either from the camera not being steady or from the motion of your subject. To illustrate this, Maria and I headed outside and took some photos jumping in front of the camera. Here is a photo with a shutter speed of 1/60 seconds. Maria and I are just some blurry blobs.
We then adjusted the camera to a shutter speed of 1/320 seconds, over five times faster. Instead of ghostly blurs, we are now crisp and clean.
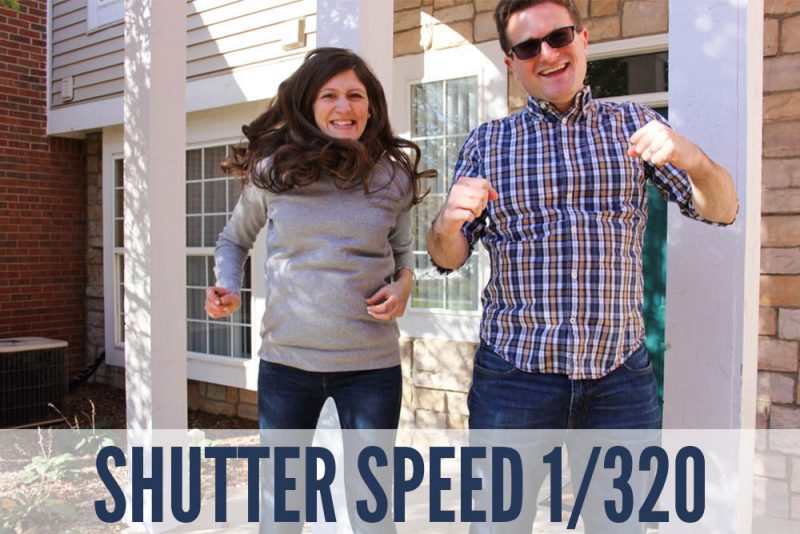
In the photos above, the shutter speed at 1/320 of a second let in a lot less light than the shutter speed at 1/60 of a second and, therefore, much less light was allowed to hit the camera sensor. When you have a much faster shutter speed, you need to increase the aperture (or the ISO) to compensate for the reduced amount of light from the shutter. All three camera functions need to work together harmoniously to produce a well-lit photo.
Accounting for Motion in your Photos
It’s not just motion of your subjects that you need to be aware of. You also need to consider the motion of the camera. If you are working with a slow shutter speed and are holding the camera in your hand, the photo might turn out blurry because your hand isn’t very steady. Generally, the average person is able to take a clear photo holding a camera with a shutter speed as low as 1/60, but after that things can get pretty dicey and the smallest movement will cause an entire photo to blur. The best way to prevent this type of issue is to mount the camera on a tripod when your shutter speed dips below 1/60.
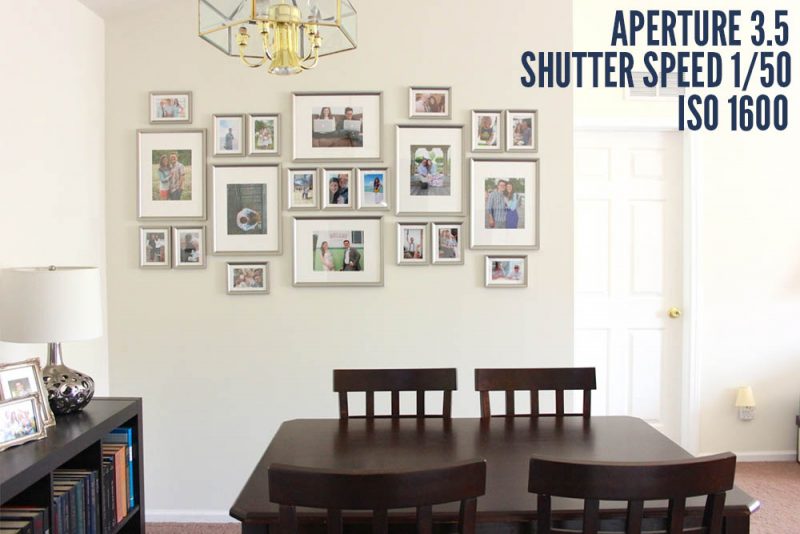
Maria took the above photo with the help of a tripod to show off our new gallery wall. This corner of the condo is far from any windows and is always dark and shadowy. You can see our camera settings on the image and I’ll explain how we arrived at each setting to end up with a brightly lit photo.
1 – We knew we didn’t have much light to work with so we had to leverage all of the light we could. We completely opened all of the blinds in our living room to add as much light into the room as we possibly could.
2 – Even with the blinds fully open, we still needed to bring more light into the lens. Maria set the camera’s ISO to 1600, which increased the sensitivity of the camera’s light sensor. The ISO on Maria’s camera goes all the way up to 6400, but she didn’t want to allow for too much grain or noise in the photo.
3 – This image was captured with the 18-55mm kit lens that came with our camera. Maria zoomed all the way out and set the aperture to f/3.5, which is the widest aperture possible for that lens. This opened the lens fully to let in maximum light.
4 – The only setting left to adjust was shutter speed. In order to make our dark corner appear bright, we needed the shutter to stay open a little longer, which would let in more light while it was open. A shutter speed of 1/50 created great illumination within the photo. Since 1/60 is about the slowest shutter speed that Maria can clearly capture while holding the camera in her hands, she mounted the camera on our tripod to take the photo. The resulting photo was beautifully lit.
Much like the different aperture settings, motion blur isn’t necessarily a bad thing. Sometimes you may want motion blur, like those cool photos of car headlight contrails on a street at night. You just need to be aware of it so you don’t have it when you don’t want it.
Putting It All Together
As a quick recap, here is a summary of the things you need to pay attention to.
- Light. How bright is it? Is it a sunny day or overcast? Are you indoors or out?
- ISO is the light sensitivity of the camera sensor. The brighter it gets, the lower your number should be. Adjust this first. 100-200 for bright, sunny days, generally. 400-800 for bright rooms, cloudy days or dusk. 1600 for night and general indoor photos. Avoid really high ISO settings as they lead to grainy photos.
- Aperture is the size of the hole in your lens. The smaller the number, the bigger the hole and the more light you let in. Also, the bigger the hole, the blurrier your background becomes. Maria and I generally shoot with an aperture of 2.8 or 3.2 for a nice, soft background.
- Shutter speed is how long your camera sensor is exposed to light in seconds (or, to be more precise – how long your sensor is exposed to light in fractions of a second.) A longer shutter speed with a small denominator means more light hits the sensor and gives you brighter photo. Motion blur is a concern with longer shutter speeds, so you need to be careful with those (unless you want the motion blur). Shorter shutter speeds with a big denominator reduce the amount of motion in the photo, but also limit the brightness of your image.
The photo wall example above shows how all three camera settings tie together with the available light to make a great photo. You can apply these four steps to any situation. For a different example, if you were shooting your dog running outside on a bright day, you would set the ISO to 100 or 200, then set a fast shutter speed since your dog is running and you don’t want motion blur, then set a wide aperture (small number) to let it more light to compensate for the fast shutter speed.
I can talk about different examples ad nauseum, but the best way to get better at this is to just do it. Start taking more pictures; bring your camera with you. Experiment with these settings and you’ll eventually find them to be almost automatic. I barely even think about these anymore; it’s second nature by now and I just quickly make the adjustments before shooting away.
Learn More About Photography
If you’d like to read more about how we take photos or our photography style, we have plenty of tips and information to share. Click any of the links below to learn more.


Wow! What an informative post! I am definitely saving this for later review. I am hoping to snag a nice camera on Black Friday and start utilizing this tutorial!
Thanks! Good luck and I hope it helps!
AMAZING post, thank you so much!! None of those numbers and settings have ever made sense to me… I don’t even remember if they made sense to me when I took a photography class in high school ;-), but if they did, I have long since forgotten! THANK YOU for making it simple and easy to understand!!
Thanks so much!
Such a great post! Thank you for breaking it down to terms that amateur photographers can understand! Here is my question, I went and took pictures this morning, and when I took them my subject (my daughter) was blurry, but the background (trees) was in focus. What do I need to change? Thank you for your help!
Ashley
Ashley, I don’t know exactly what’s going on there. The ISO, aperture and shutter speed shouldn’t affect your camera’s autofocus. Have you perhaps changed the autofocus point in your camera? This post might be of help: http://www.digitalcameraworld.com/2013/02/07/af-points-how-to-take-control-of-autofocus-to-get-the-shots-you-want/
Good luck!
Thank you for this excellent and VERY informative post! I can never get my pics to be clear in auto mode, so this tutorial on manual mode is extremely helpful! I wish there was a printable version. :)
Thanks, Kim! Good luck! We’ll think about the printable version. :-)
This is JUST what I have been looking for to figure out how to really work my camera!! Thank you for taking the time to put all the info together in one amazing post!! Three years later and I’ll finally be a pro at taking some pictures over the holidays!
Thank you so much! This had a perfect amount of detail to me. Love the example images and graphics. Just in time for Christmas cards!!
Thank you for sharing! I went from T3i to 5D Mark III! I’ve got lots to learn!
When I started to practice my photography skills with Canon EOS 6D last year, firstly I practiced on my trip to Cambridge. I was taking photos od colleges outside with full light and beautiful Autumn colours. With auto mode I took some nice photos but I wanted to learn how to use manual mode. How I learned it? Chosen some good photos taken in auto mode, checked the settings, used the same with manual and started to fit it to the next scenery but with manual. That’s how I learned how to use manual taking pictures outside and inside. The first thing is to PRACTICE as much as you can and whenever you can. Your article was very informative, thank you for it!
Can u sold ur camera
Your blog is the first of many that I have read that gave me clarity on shooting in manual mode. I will definitely try out your pointers. Thank you a bunch!!!
Thanks for the tips!! check out my website http://hollyjosphotography.com/
Thank you so much for the tips. Check out this photography site
http://knbinterdesign.com/
Very interesting and informative have really learned lots .